Event organizers often overlook just how much depends on the correct installation of a mirror ball. Even a small wiring mistake can risk audience safety and ruin the show. Whether you are preparing for a dazzling party or a professional stage event, understanding each step of the setup process brings peace of mind and reliable results. This guide will show you the tools, techniques, and safety checks needed to achieve a flawless and compliant mirror ball installation.
Table of Contents
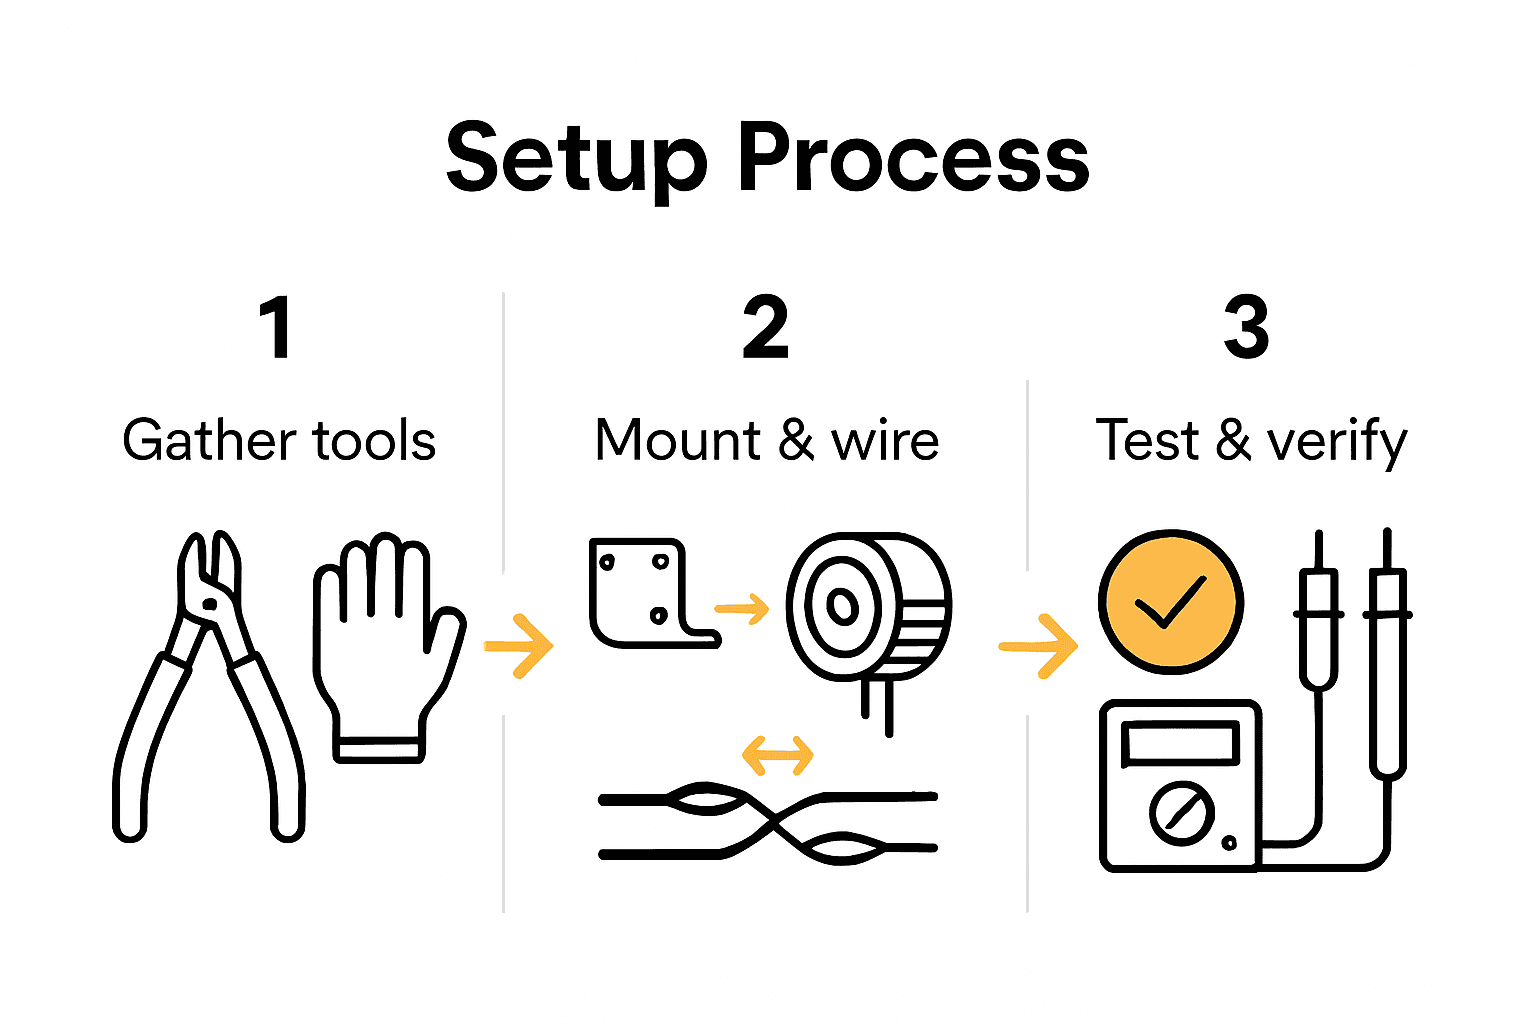
- Step 1: Gather Essential Tools And Components
- Step 2: Mount The Mirror Ball And Motor Securely
- Step 3: Wire The Motor And Power Connections
- Step 4: Integrate Control Systems Or Dmx Units
- Step 5: Test And Verify Mirror Ball Operation
Quick Summary
| Key Point | Explanation |
|---|---|
| 1. Gather necessary tools first | Ensure you have all essential tools like wire cutters, strippers, and safety gloves before beginning installation. |
| 2. Securely mount the mirror ball | Use appropriate brackets and high tensile bolts to firmly attach the mirror ball for safe and reliable operation. |
| 3. Follow electrical safety standards | Hire a qualified electrician for wiring, and use cables rated for event lighting to minimize hazards. |
| 4. Properly configure DMX controls | Set the correct DMX address to ensure synchronization between the mirror ball motor and lighting functions. |
| 5. Conduct thorough final testing | Perform extensive checks on rotation, electrical connections, and DMX control functionality before the event. |
Step 1: Gather Essential Tools and Components
Wiring mirror balls requires careful preparation and the right equipment to ensure a safe and professional installation. According to the Health and Safety Executive, proper planning and equipment selection are crucial for supporting event devices safely.
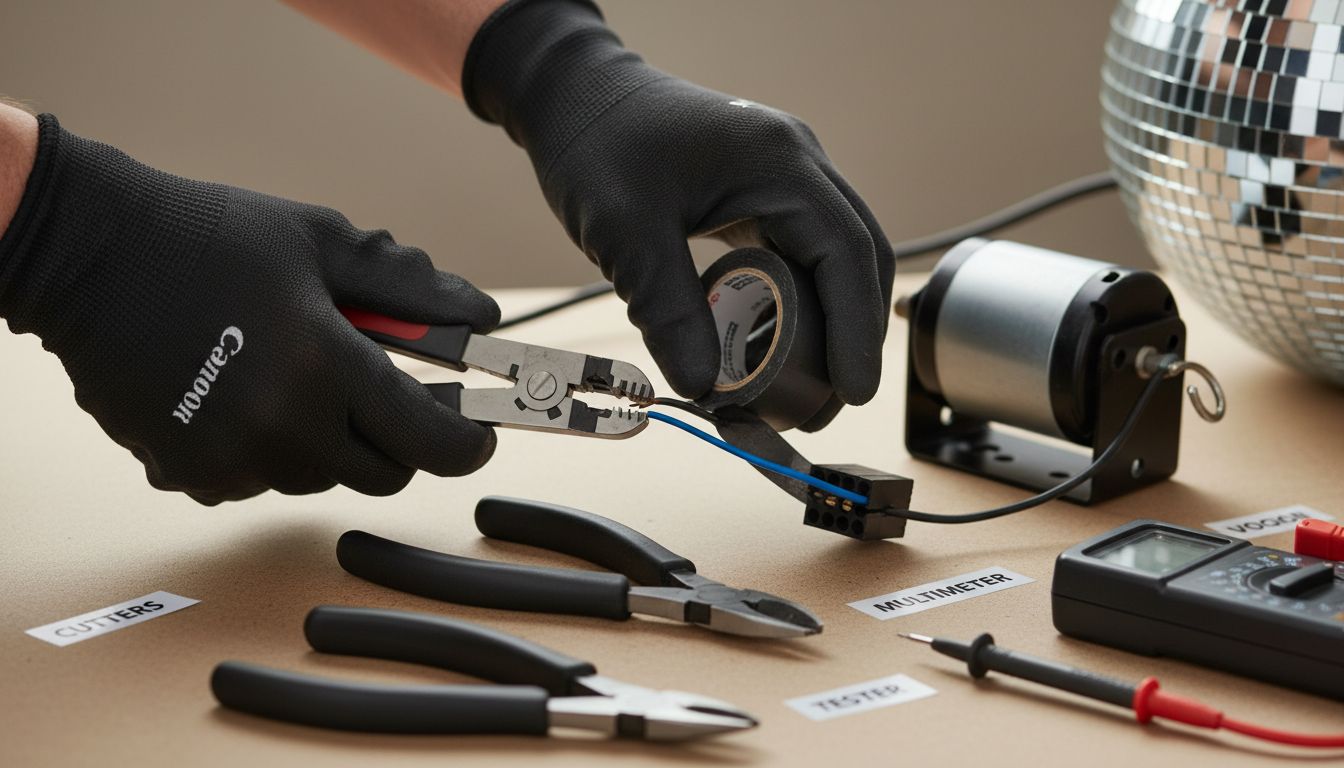
You will need several key tools and components to wire your mirror ball effectively. Your essential kit should include electrical wire cutters, wire strippers, electrical tape, multimeter, safety gloves, voltage tester, mounting brackets, electrical connectors, and appropriate gauge electrical cables. Look for cables rated specifically for event lighting installations to prevent potential electrical hazards.
As the Rossendale Borough Council Event Safety Guide recommends, always ensure electrical installations are completed by a qualified electrician who understands current wiring regulations. Double-check that all your components are compatible and in good condition before beginning the installation process.
 Safety first means taking time to inspect each piece of equipment thoroughly.
Ready to start gathering your tools? The next step will walk you through the specific wiring preparation techniques to get your mirror ball installation underway.
Step 2: Mount the Mirror Ball and Motor Securely
Securing your mirror ball and motor correctly is critical for both performance and safety. According to the Cambridge City Council May Ball Organisers Handbook, remote reflectors like mirror balls must be rigidly locked and securely mounted, with temporary installations requiring adjustable mountings and permanent setups needing secondary fixing to prevent potential movement.
Begin by selecting a robust mounting bracket that matches your mirror ball’s weight and size. Position the bracket at a strategic point where the ball can rotate freely without obstruction. Use high tensile bolts and ensure they are tightened to manufacturer specifications. When attaching the motor, align it precisely with the ball’s central axis to guarantee smooth rotation. Check out our guide on mirror ball mounting kits for additional detailed insights into proper installation techniques.
The Health and Safety Executive emphasizes that equipment supporting devices must be fit-for-purpose to prevent potential accidents. Always conduct a thorough pre-installation inspection, checking for any structural weaknesses in your mounting points. Verify that all connections are secure and that the mirror ball can withstand expected movement and vibration during operation.
With your mirror ball mounted securely, you are now ready to move on to the electrical wiring stage of your installation.
Step 3: Wire the Motor and Power Connections
Wiring the motor and power connections requires precision and careful attention to electrical safety standards. According to the Rossendale Borough Council Event Safety Guide, all electrical installations must be completed by a qualified electrician who adheres to current I.E.E. wiring regulations and uses appropriately rated cables to prevent potential electrical hazards.
Begin by identifying the correct power supply for your mirror ball motor. Ensure you have the right voltage rating and amperage requirements for your specific motor model. Strip the electrical wires carefully using wire strippers, exposing approximately 10 millimetres of copper conductor. Connect the live wire to the positive terminal, neutral wire to the negative terminal, and ground wire to the earth connection. Explore our comprehensive guide on understanding mirror ball motors for more detailed insights into electrical connections.
As highlighted by PMMS Ltd, obtaining an Electrical Installation Certificate is crucial for documenting your work and ensuring compliance with Building Regulations. Double-check all connections are secure and properly insulated. Use electrical tape to cover exposed wire connections and prevent any potential short circuits. Always test the motor rotation and electrical connection before final installation to confirm smooth and safe operation.
With your motor and power connections completed, you are now prepared to move on to the final testing and calibration stage.
Step 4: Integrate Control Systems or DMX Units
Integrating a DMX control system with your mirror ball requires precision and technical understanding. According to The Lights’ Technical Guide, proper configuration is essential to ensure synchronized lighting operation during events, with DMX-controlled fixtures requiring careful setup and programming.
Start by identifying the DMX address for your mirror ball motor. Most DMX controllers allow you to set unique addresses using small switches or digital menus. Typically, each DMX channel controls a specific function like rotation speed or direction. Carefully consult your specific mirror ball and DMX controller manuals to confirm the correct addressing sequence. Explore our Transcension 6-Channel DMX Controller for advanced control options that can simplify this process.
The technical documentation from The Lights emphasizes the importance of precise programming to achieve desired lighting effects. Before your event, conduct a thorough test run to verify that the DMX unit correctly communicates with your mirror ball. Check that rotation speeds, directional changes, and any additional lighting features respond accurately to your control inputs. Ensure all cables are securely connected and that there are no interference points in your signal chain.
With your control systems integrated and tested, you are now ready for the final stage of your mirror ball installation.
Step 5: Test and Verify Mirror Ball Operation
Final verification of your mirror ball installation is crucial for ensuring safe and reliable performance. According to the Health and Safety Executive, all equipment supporting lighting devices must be thoroughly tested to prevent potential equipment failure and ensure fit-for-purpose operation.
Begin with a comprehensive visual inspection of all mounting points, electrical connections, and mechanical components. Power up the mirror ball and observe its rotation, checking for smooth movement without unusual vibrations or sounds. Test each DMX control function systematically: verify rotation speed variations, directional changes, and any programmed lighting sequences. Consult our 2025 Mirror Ball Troubleshooting Guide if you encounter any unexpected performance issues during testing.
The Rossendale Borough Council Event Safety Guide recommends having a qualified electrician certify your electrical installation to ensure it meets professional safety standards. Document your testing process including date, performance observations, and any adjustments made. Conduct a final test run under full event lighting conditions to simulate actual performance environment and confirm everything operates precisely as expected.
Congratulations. Your mirror ball is now professionally installed and ready for its spectacular debut.
Ensure Safe and Stunning Mirror Ball Installations with Expert Equipment
Wiring mirror balls involves careful attention to safety and precision to create the perfect dazzling effect without risking accidents. If you have been following our guide on “How to Wire Mirror Balls for Safe Event Installations,” you understand the importance of using the right tools, mounting kits, and electrical components to meet strict safety standards and achieve smooth performance. Avoid the common pitfalls of poorly fitted brackets or incorrect wiring by choosing reliable products tailored for professional and amateur use alike.

Start transforming your event space today with top-quality mirror balls and accessories from mirror-balls.co.uk. Whether you need mounting kits designed for secure installation, motors compatible with DMX systems, or comprehensive wiring accessories, we have everything to help you complete your project with confidence and style. Explore our detailed product listings now and let us assist you in bringing your mirror ball installation safely to life.
Frequently Asked Questions
What tools do I need to wire a mirror ball safely?
You will need electrical wire cutters, wire strippers, electrical tape, multimeter, safety gloves, voltage tester, mounting brackets, and appropriate gauge electrical cables. Gather all these tools before starting your installation to ensure a smooth process.
How do I securely mount a mirror ball and its motor?
To securely mount a mirror ball, use a robust mounting bracket that matches the ball’s weight and size. Position the bracket so the ball can rotate freely and tighten all bolts to the manufacturer’s specifications.
What are the steps for wiring the motor and power connections for a mirror ball?
Strip the electrical wires and connect the live wire to the positive terminal, neutral wire to the negative terminal, and ground wire to the earth connection. Ensure all connections are secure and insulated to prevent short circuits before testing the motor rotation.
How do I integrate a DMX control system with my mirror ball?
Identify the DMX address for your mirror ball motor and set it using your DMX controller. Carefully consult both the mirror ball and DMX controller manuals during setup to ensure each channel operates correctly for optimal control during your event.
What final tests should I perform on a mirror ball installation?
Conduct a comprehensive visual inspection of all components and then power up the mirror ball to check for smooth rotation and appropriate responses to DMX controls. Document your observations and adjustments and run tests under full event lighting conditions to confirm everything works as designed.
Why is it important to hire a qualified electrician for wiring a mirror ball?
Hiring a qualified electrician ensures that all electrical installations meet current safety standards and regulations. This reduces the risk of electrical hazards and guarantees a safe setup for your events.